SLAs
Automate SLAs for issues that should be completed within a certain amount of time.
Available to workspaces on Business and Enterprise plans
Overview
SLAs automatically apply deadlines to issues that match defined conditions. While traditionally used to describe service level agreements with your customers, SLAs can also be used to maintain internal standards for how quickly bugs will be fixed and time-sensitive issues will be resolved.
Configure
Enable the feature in Settings > Issues > SLAs, then create rules that apply or remove SLAs when issues match defined conditions. Rules are evaluated when issues are created or updated. Creating or changing a rule does not automatically apply it to existing matching issues.
SLAs won’t be applied to existing issues that have already been prioritized. Changing the priority of an existing issue will trigger SLAs however once the change matches your SLA rules.
Basics
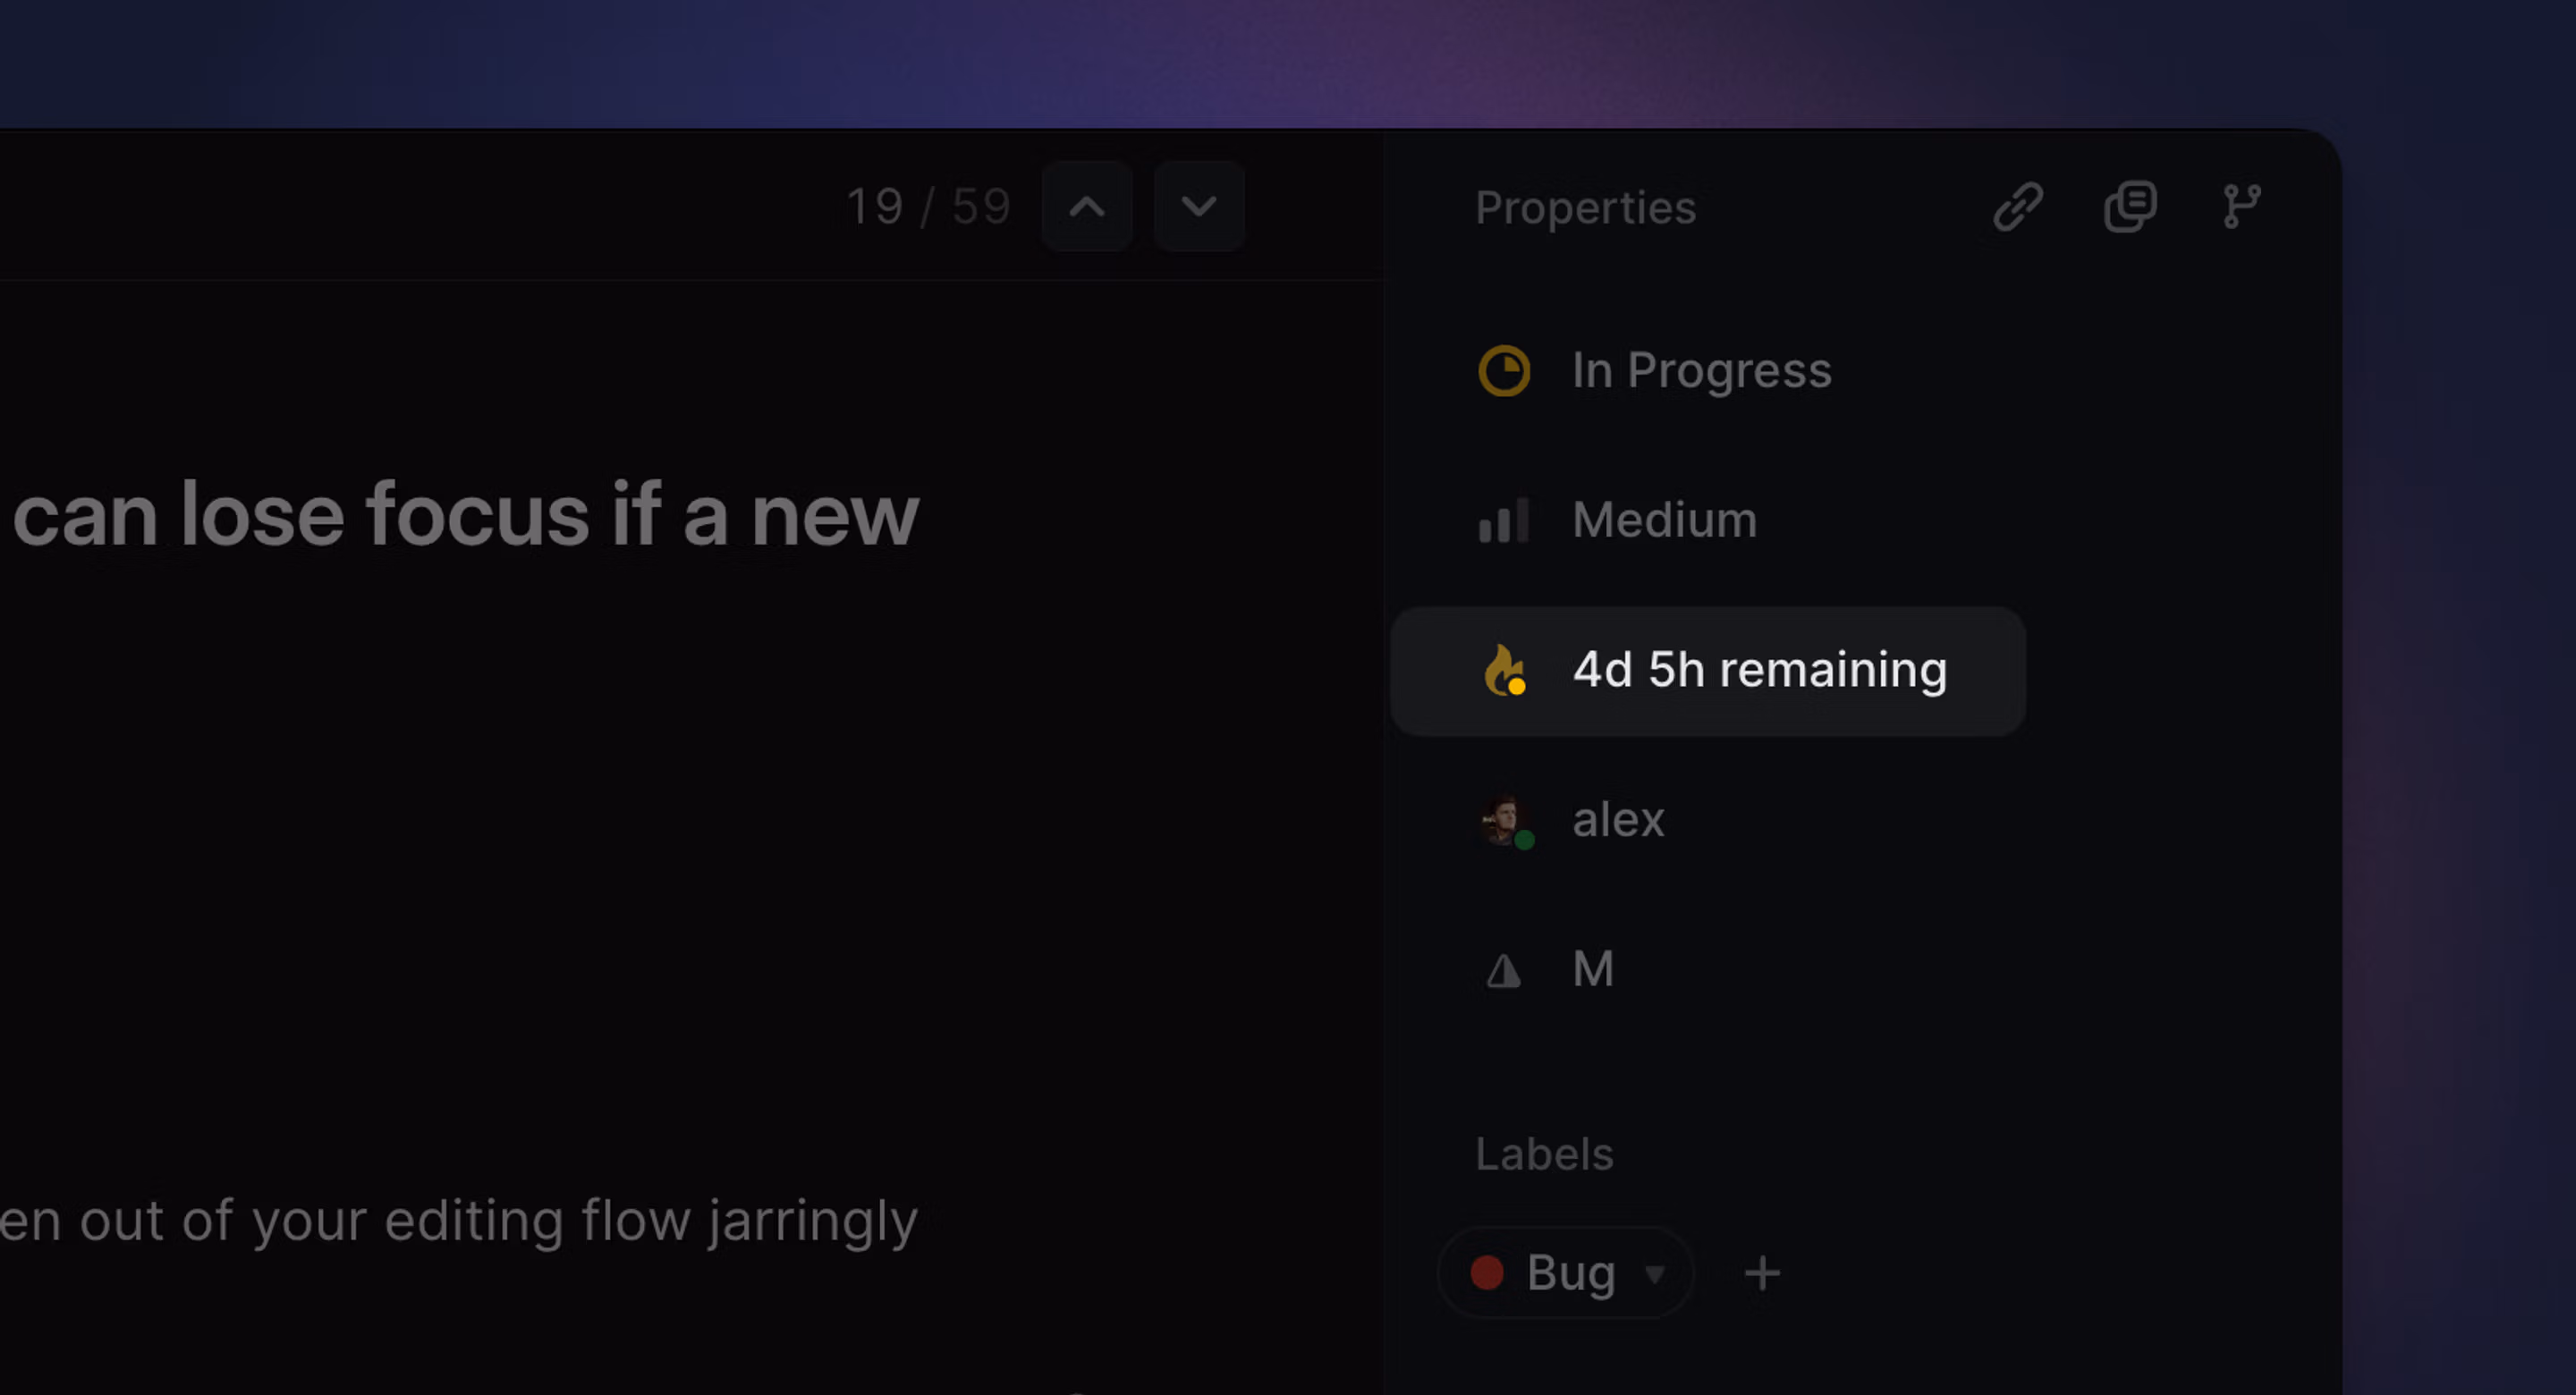
SLAs appear on issues as a fire icon which transitions from gray > yellow > orange > red as an issue nears and breaches the SLA. Once the issue is completed, the SLA field remains and shows the completion time down to the minute and whether the SLA was achieved or failed.
SLAs are automatically created on any issue that matches the rules set in SLA settings. You can also manually add SLAs to issues if desired.
Default SLAs
When you enable SLAs, you’ll enable a set of default rules:
- When Priority is Urgent, add a 24 hour SLA
- When Priority is High, add a 1 week SLA
- When Priority is Medium, Low, or No Priority, remove the SLA
You can edit, delete or create new SLA rules as desired.
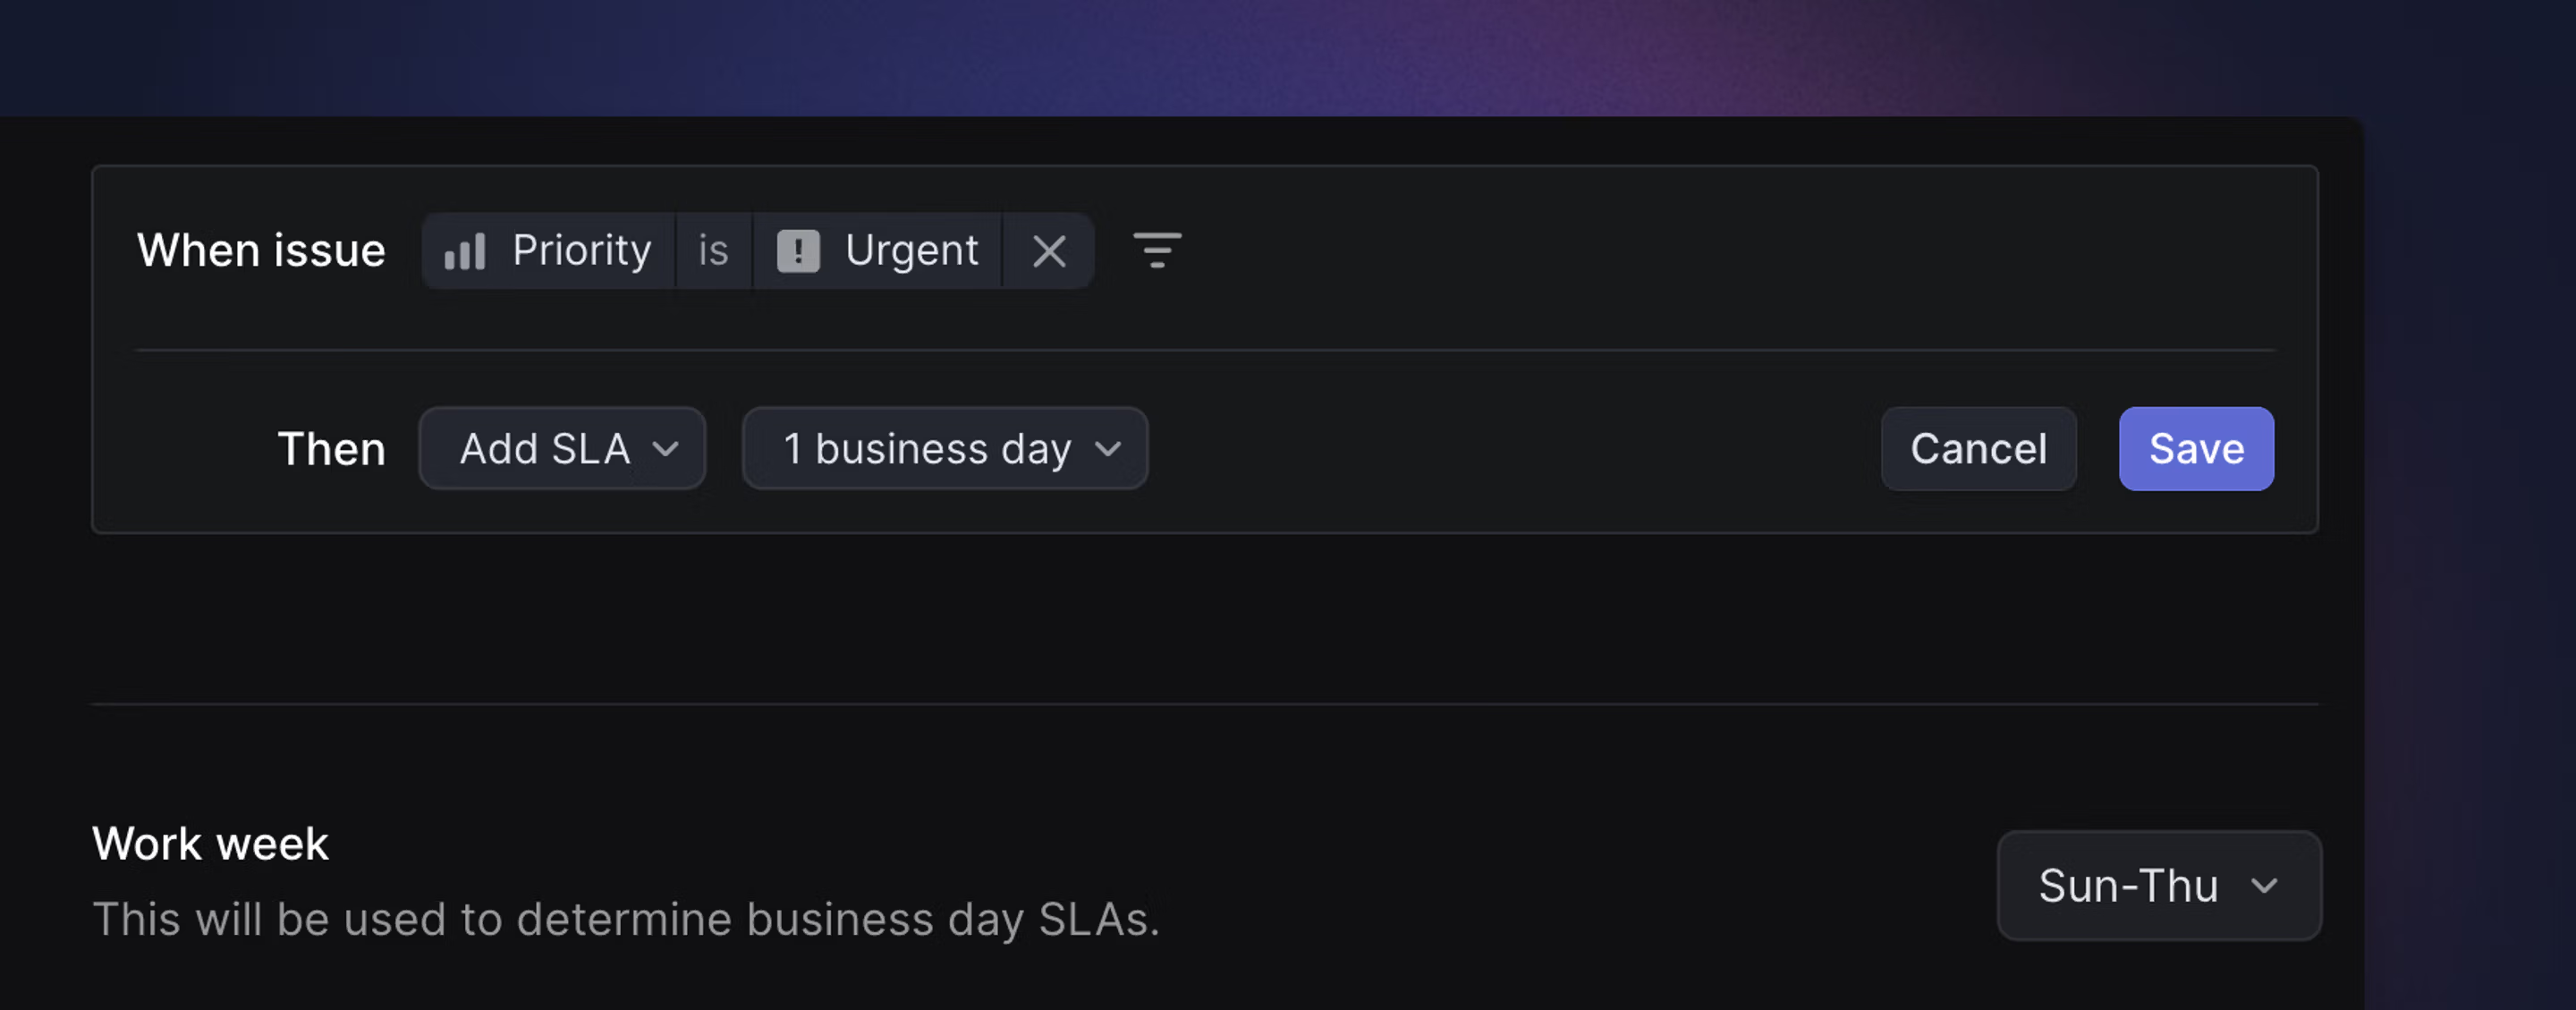
Create new SLA rules
Select New Rule to create a new SLA rule.
Set the time interval to any of the following durations:
- 12 hours
- 24 hours
- 48 hours
- 1 week
- 2 weeks
- 4 weeks
- Custom time: Hour, Day, Business day and Week
You can filter by almost any field to specify when SLAs should be applied, including Team, Status, Assignee, Creator, Priority, Labels, Project, Project Status, and Initiative, and filters can be combined.
When an issue matches multiple SLA rules, only the first matching rule is applied. Arrange rules in the order you want them to be evaluated.
Business day SLAs
When configuring an SLA with a custom duration, choose ‘Business days’ to exclude days outside your work week. By default, business days are Monday through Friday.
On the SLA settings page, you can optionally set your work week to Sunday through Thursday. This affects SLA calculations and other features that skip non-working days, such as project update reminder nudges.
When manually setting an SLA on an issue, you can choose business days or standard days.
Remove SLAs
Linear’s default SLA rules contain conditions to remove SLAs when priority is marked as Medium, Low, or No priority. These “removal” rules are helpful to maintain data hygiene, so that if an issue’s priority is downgraded, SLAs which are no longer relevant will be removed. We recommend keeping these in the workspace.
SLA status and filtering
Linear groups SLAs into different SLA statuses. You will be able to filter and organize views of issues by their SLA status, and the different statuses will be indicated by the color of the SLA icon.
| SLA status | Definition |
|---|---|
| Low risk | More than 1 week away from SLA |
| Medium risk | Within 1 week of SLA |
| High risk | Within 1 day of SLA |
| Breached | SLA has passed |
| Achieved | Issue was completed within SLA |
| Failed | Issue was completed after SLA was breached |
SLA notifications
Subscribers to an issue with an SLA receive notifications in their Inbox when SLAs are 24 hours away from being breached as well as when SLAs are breached. Individuals can opt in to receive notifications whenever any issue in their Team has an SLA, too. Manage these notifications in settings under Account > Notifications.
Slack team notifications for “an issue is at risk of breaching SLA” are sent 24 hours before the SLA breaches, or if using business day SLAs, one business day.
Viewing SLA issues
You can filter any view to see issues according to SLA status: Breached, High Risk, Medium Risk, Low Risk, Achieved, Failed, and No SLA.
Insights offers a helpful way to evaluate how well you’re meeting your SLAs. Filter a view by SLA, set Insight parameters to Issue count (measure) and SLA status (dimension) to see a clear breakdown of how well you’re meeting your SLAs.
Manually apply SLAs
You can add an SLA to an existing issue even when it doesn’t match a predefined rule. Open the issue, select the three-dot menu, then choose Set SLA.
Applying an SLA clears any existing due date from the issue.
If the issue matches an SLA removal rule, the SLA may be removed automatically when the issue is updated. Review or adjust the applicable rule before setting the SLA manually.
FAQ
We recommend creating a custom view filtered down to issues that contain SLAs. You can group the view by SLA status and also use Insights to explore the data.